Polyglot monorepo build and maintenance automation
3,626 words · 19 min read

By Archie Cowan
Senior Prototype Developer for AWS global and strategic customers, former ITHAKA/JSTOR Chief Architect. Generative AI builder. Aspiring to do everything.

You're a user of CDK and Typescript. You build applications with Typescript, Javascript, Python, or Java. Want to increase the leverage of your code for reuse in your source repositories? In this article, we'll empower you with tools for automation to improve the way you manage source code.
Consider the following statements.
I’d rather not…
- Copy code from one folder to another to reuse it.
- Put all my code in one package because of a limited build infrastructure.
- Remember to rebuild each package I make before I deploy it to AWS with CDK.
- Manage package repository infrastructure
But I want to…
- Create reusable code packages.
- Consume reusable code by importing packages rather than copying and pasting.
- Keep reusable components and project specific code separated in my repository.
- Keep my build artifacts up to date with minimal rebuilds and zero manual efforts.
If these thoughts resonate, you will take a keen interest in the solutions discussed here.
We will cover the following learning objectives in this article:
- Get experience with managing a monorepo using Projen abstractions.
- Build blueprints for packages that live inside the monorepo.
- Learn Projen’s “escape hatch” features for modifying managed objects.
- Learn the difference between managed objects and sample files in Projen.
- Deploy a webapp to AWS on S3 and CloudFront using CDK
- Create implicit dependencies between packages
- Create new build tasks and override existing tasks
CDK is to AWS services (ec2, lambda, s3, sagemaker, etc) As Projen is to software project infrastructure (npm, maven, pip, poetry, eslint, prettier, tsconfig, nx, git, etc)
Introduction
What if we managed our software project infrastructure like we manage cloud infrastructure? That was a question the creator of Projen asked themselves as they set out to create the tooling we examine today.
Modern software project infrastructure includes many different pieces. Especially in repositories that contain monorepo’s with many projects.
- build files
- linting files
- formatting configuration
- compiler configuration
- package manager configuration
- unit test configuration
- integration test configuration
- numerous build steps
In a monorepo you have all of that times the number of projects in your repository. In a polyglot repository, you’ll have that for different technology stacks too. On top of this, the number of tools we configure in our projects is growing!
Projen aims to improve the experience of managing project infrastructure by creating extensible constructs to facilitate upkeep of these files. Instead of creating or updating files manually, you have code that models your projects. Enabling you to automate this toil away using that model.
Let’s get a sense for the possibilities by exploring how Projen works. For demonstration sake, we will build a small example application:
- A webapp blueprint with Vite
- A react component blueprint with Vite
- Create a webapp package and library package using the blueprints
- A CDK application to deploy the webapp
Let’s open a terminal and build something.
We’re going to look at Projen by itself first to make clear the role Projen plays later as we work with two other tools. Our ultimate goal is to deploy a serverless stack to AWS with a reactjs frontend.
Bootstrapping a new monorepo:
mkdir prototype-with-pdk
npm install -g pnpm
git init
echo v18.16.0 > .nvmrc
nvm use
nvm install # if needed
npx @aws/pdk new --package-manager=pnpm monorepo-ts
Note: this assumes you're an nvm user but any tool version manager, such as asdf, will work fine.
Opening
.projenrc.ts, we have thisimport { javascript } from "projen";
import { monorepo } from "@aws/pdk";
const project = new monorepo.MonorepoTsProject({
devDeps: ["@aws/pdk"],
name: "pdk-for-prototyping",
packageManager: javascript.NodePackageManager.PNPM,
projenrcTs: true,
});
project.synth();
I like to enable prettier with 4 space indentation, double quotes, and to disable eslint at the root project so that I can customize it on a per project basis.
Adding these lines to the constructor input…
prettier: true,
prettierOptions: {
    settings: {
        tabWidth: 4,
        singleQuote: false,
    },
},
eslint: false,
Now the new
.projenrc.ts file looks like thisimport { javascript } from "projen";
import { monorepo } from "@aws/pdk";
const project = new monorepo.MonorepoTsProject({
devDeps: ["@aws/pdk"],
name: "pdk-for-prototyping",
packageManager: javascript.NodePackageManager.PNPM,
projenrcTs: true,
prettier: true,
prettierOptions: {
settings: {
tabWidth: 4,
singleQuote: false,
},
},
eslint: false,
});
project.synth();
Now, it’s good to capture what Projen is updating so I like to at least stage my commit for this change before I regenerate.
git add .projenrc.ts
Now regenerate your project.
npx pdk
You’ll see Projen output there as your project is updated. Now I have these changes in my repo:
% git status
On branch main
Changes to be committed:
(use "git restore --staged <file>..." to unstage)
modified: .projenrc.ts

Changes not staged for commit:
(use "git add/rm <file>..." to update what will be committed)
(use "git restore <file>..." to discard changes in working directory)
deleted: .eslintrc.json
modified: .gitattributes
modified: .gitignore
modified: .npmignore
modified: .prettierrc.json
modified: .projen/deps.json
modified: .projen/files.json
modified: .projen/tasks.json
modified: package.json
modified: pnpm-lock.yaml
At this point, commit all the changes and next we’ll add some projects to our monorepo.
Creating a Vite webapp blueprint
My biggest objection initially to the way Projen works was that the last thing I want a week before a deadline is to fight with my code generation tool to modify a compiler config in a novel way to resolve a problem I didn’t anticipate.
Walking through the process of creating project blueprints gave me confidence that I could maneuver within Projen to get what I needed even with tight time constraints. So, I think it’s a good experience to walk through these steps. We will understand the escape hatches as we set up a new blueprint in this section.
Here’s what we’re going to do:
- Extend the typescript base project class for our new vite blueprint.
- Using an escape hatch to update tsconfig.
- Update build tasks.
- Creating sample files and learn the difference between sample files and object files.
- Observe the 3 ways we can run tasks on our projects.
First, we’ll start a blueprints folder for our Vite blueprints. There will be two blueprints when we’re finished.
mkdir -p blueprints/vite
cd !$ # cd blueprints/vite
Initialize the vite base template for an example.
pnpm create vite@latest app --template react-swc-ts
Create
blueprints/vite/blueprint.app.ts in your editor. We can start with this:import { typescript } from "projen";
import { TypeScriptProjectOptions } from "projen/lib/typescript";
export class ViteReactSWCTypescriptAppProject extends typescript.TypeScriptAppProject {
constructor(options: TypeScriptProjectOptions) {
super({
...options,
sampleCode: false,
});
}
}
Then in
.projenrc.ts, we can initialize this new class. Here’s my entire .projenrc.ts at this point:import { javascript } from "projen";
import { monorepo } from "@aws/pdk";
import { ViteReactSWCTypescriptAppProject } from "./blueprints/vite/blueprint.app";
const defaultReleaseBranch = "main";
const packageManager = javascript.NodePackageManager.PNPM;
const project = new monorepo.MonorepoTsProject({
devDeps: ["@aws/pdk"],
name: "pdk-for-prototyping",
packageManager,
projenrcTs: true,
prettier: true,
prettierOptions: {
settings: {
tabWidth: 4,
singleQuote: false,
},
},
eslint: false,
defaultReleaseBranch,
});
new ViteReactSWCTypescriptAppProject({
parent: project,
name: "mywebapp",
defaultReleaseBranch,
packageManager,
outdir: "packages/mywebapp",
});
project.synth();
Now run
npx pdk to generate packages/mywebapp from our blueprint to inspect what changed.% ls -l packages/mywebapp/
total 64
-r--r--r--@ 1 acowan staff 11358 Feb 5 07:30 LICENSE
-rw-r--r--@ 1 acowan staff 14 Feb 5 07:30 README.md
drwxr-xr-x@ 14 acowan staff 448 Feb 5 07:30 node_modules
-rw-r--r--@ 1 acowan staff 1901 Feb 5 07:30 package.json
-r--r--r--@ 1 acowan staff 2221 Feb 5 07:30 project.json
-r--r--r--@ 1 acowan staff 826 Feb 5 07:30 tsconfig.dev.json
-r--r--r--@ 1 acowan staff 827 Feb 5 07:30 tsconfig.json
Comparing tsconfig to our vite application, we can see that we have some adjustments to make here. So, let’s start by defining the specifics of our tsconfig in our blueprint class.
import { typescript } from "projen";
import {
TypeScriptJsxMode,
TypeScriptModuleResolution,
} from "projen/lib/javascript";
import { TypeScriptProjectOptions } from "projen/lib/typescript";

export class ViteReactSWCTypescriptAppProject extends typescript.TypeScriptAppProject {
    constructor(options: TypeScriptProjectOptions) {
        super({
            ...options,
            sampleCode: false,
            tsconfig: {
                compilerOptions: {
                    target: "ES2020",
                    lib: ["ES2020", "DOM", "DOM.Iterable"],
                    module: "ESNext",
                    skipLibCheck: true,
                    moduleResolution: TypeScriptModuleResolution.BUNDLER,
                    allowImportingTsExtensions: true,
                    resolveJsonModule: true,
                    isolatedModules: true,
                    noEmit: true,
                    jsx: TypeScriptJsxMode.REACT_JSX,
                    strict: true,
                    noUnusedLocals: true,
                    noUnusedParameters: true,
                    noFallthroughCasesInSwitch: true,
                },
                include: ["src"],
            },
            tsconfigDev: {
                compilerOptions: {
                    skipLibCheck: true,
                    module: "ESNext",
                    moduleResolution: TypeScriptModuleResolution.BUNDLER,
                    allowSyntheticDefaultImports: true,
                },
                include: ["vite.config.ts"],
            },
        });
    }
}
We are working in Typescript and Projen provides a strongly typed struct for the tsconfig. While types can accelerate us as our IDE helps us understand what we need to input. The typing also presents our first obstacle and opportunity to use escape hatches. As you may have already taken note if you’re meticulously comparing this to the tsconfig files generated by Vite, there are a few missing options in Projen’s type definition:
useDefineForClassFields, references, and composite.This is our first opportunity to use projen’s escape hatches. So, let’s define overrides for these fields so that these settings are included.
Place these lines below your super call in the constructor:
this.tsconfig?.file.addOverride(
    "compilerOptions.useDefineForClassFields",
    true,
);


this.tsconfig?.file.addOverride("references", [
    { path: "./tsconfig.dev.json" },
]);


this.tsconfigDev.file.addOverride("compilerOptions.composite", true);
Now, when we run
npx pdk, these settings are included in our output files.I do note that the
tsconfig.node.json is not the name of the file we’re using in our output project. tsconfig.dev.json is filling this role for us per projen’s convention. It also has a number of explicit settings that weren’t in the file that vite generated.Next let’s address
vite.config.ts, index.html files and the src, and public directories. These are files that will likely change over the course of your project and should not be controlled by Projen. So, we’ll use the files generated by Vite as our basis for this next step. We’ll reference these in our blueprint class as sample files and sample directories. Add these lines to your constructor:if (options.sampleCode) {
new SampleFile(this, "vite.config.ts", {
sourcePath: path.join(__dirname, "app", "vite.config.ts"),
});
new SampleFile(this, "index.html", {
sourcePath: path.join(__dirname, "app", "index.html"),
});
new SampleDir(this, "src", {
sourceDir: path.join(__dirname, "app", "src"),
});
new SampleDir(this, "public", {
sourceDir: path.join(__dirname, "app", "public"),
});
}
What’s a sample file or directory? These files are initialized at project creation time only if they do not exist. So, this is a helpful construct to get projects started like other project generators. These classes also provide a way to directly specify the content of the files should you wish to generate your code with other tools but we won’t cover this right now. Just mentioning it.
Run
npx pdk to verify the output in packages/mywebapp. You should find your files are copied to your project.Next, let’s address the contents of the
package.json file. Our vite application has a set of tasks to run a build and a mode for running the application while developing it. Projen generates the package.json and controls the scripts section using its task abstraction. You’ll find that Projen references its own set of task definitions in packages/mywebapp/package.json."scripts": {
"build": "npx projen build",
"compile": "npx projen compile",
"default": "npx projen default",
"eslint": "npx projen eslint",
"package": "npx projen package",
"post-compile": "npx projen post-compile",
"post-upgrade": "npx projen post-upgrade",
"pre-compile": "npx projen pre-compile",
"test": "npx projen test",
"test:watch": "npx projen test:watch",
"upgrade": "npx projen upgrade",
"watch": "npx projen watch"
},
To specify how we want Projen to execute our build and dev tasks, add the following to the blueprint constructor:
this.removeTask("build");
this.addTask("build", {
    exec: "tsc && vite build",
});
this.addTask("dev", {
    exec: "vite",
});
this.addTask("preview", {
    exec: "vite preview",
});
Run
npx pdk and you will actually find your package.json largely looks the same with the exception that there are now new build targets for the dev and preview tasks. Though, the tasks are calls to Projen instead of the commands we specified. Where do we find our actual task definitions?Inside
packages/mywebapp/.projen/tasks.json you will find the actual commands for these build targets along with a lot of other details. We’ll set those aside for the moment.The last piece we must address to complete our vite blueprint is the dependency lists in package.json. At the top of my constructor, I define these two variables:
const defaultDeps = ["react@^18.2.0", "react-dom@^18.2.0"];


const defaultDevDeps = Object.entries({
    "@types/react": "^18.2.43",
    "@types/react-dom": "^18.2.17",
    vite: "^5.0.8",
}).map(([key, value]) => `${key}@${value}`);
Projen expects a scalar string to define dependencies. I use an object to define the default dev dependencies for easier copy and paste from the vite generated
package.json.These are plugged into the super call in the constructor with the following options:
deps: [...(options.deps ?? []), ...defaultDeps],
devDeps: [...(options.devDeps ?? []), ...defaultDevDeps],
This enables us to pass down additional dependencies from
.projenrc.ts as needed, abstracting the required vite dependencies.Run
npx pdk to see the final starting point for packages/mywebapp.At this point, you can start your vite dev server 3 different ways:
The way you would have using
pnpm before with the packages/mywebapp as the working directory:pnpm dev
Using nx from any directory in the project:
npx nx run mywebapp:dev
Or using pdk from the root directory of the monorepo:
npx pdk dev
We wouldn’t have much of a monorepo with only a single package in it, right? In the next section we’ll extend our vite blueprint to generate library packages for our frontend.
Creating a Vite library blueprint
A library package is almost the same as the blueprint we just created. So, we only need to make some tweaks to the following pieces:
- One additional dev dependency.
- Additional configuration to package.json for libraries.
- Different sample files.
To get started, let’s create the file
blueprints/vite/blueprint.package.ts with our new subclass:import { SampleDir, SampleFile } from "projen";
import { TypeScriptProjectOptions } from "projen/lib/typescript";
import * as path from "path";
import { ViteReactSWCTypescriptAppProject } from "./blueprint.app";
export class VitePackageTypescriptAppProject extends ViteReactSWCTypescriptAppProject {
constructor(options: TypeScriptProjectOptions) {
}
}
Because we aren’t calling super yet in the constructor we have a compiler error. So let’s address the additional dev dependency first and make our super call.
Paste the lines into the constructor first:
    options = {
        sampleCode: true,
        ...options,
    };


    const defaultDevDeps = Object.entries({
        "vite-plugin-dts": "^3.7.0",
    }).map(([key, value]) => `${key}@${value}`);


    super({
        ...options,
        sampleCode: false,
        deps: [...(options.deps ?? [])],
        devDeps: [...(options.devDeps ?? []), ...defaultDevDeps],
    });
Just like we did in the last section, we define a default set of dev dependencies, add them to any additional libraries passed in, and pass these into the super constructor with the spread operator. The library
vite-plugin-dts is needed to compile our components as a library rather than build a final bundled application. No additional deps are needed so we pass the deps provided in options unmodified. Finally, as before, we pass sampleCode: false to disable the inclusion of the sample files of the parent. We want to include our own sample files in a minute.At this point, our new class compiles. We can add a new project to our
.projenrc.ts file with this class and build our project to check what is generated so far.Here is a new project to instantiate in
.projenrc.ts. Add this before the call to project.synth().new VitePackageTypescriptAppProject({
parent: project,
name: "@mymonorepo/mylib",
defaultReleaseBranch,
packageManager,
sampleCode: true,
outdir: "packages/mylib",
});
When you run
npx pdk, you should see your new project folder without the sample files.Next, in our
VitePackageTypescriptAppProject constructor, include these linesthis.package.file.addOverride("main", "src/index");
this.package.file.addOverride("files", ["dist"]);
These may not be strictly necessary in all cases but I found it helpful to define these configuration points explicitly.
Finally, our additional sample files are added with this:
const dir = "package";
if (options.sampleCode) {
    new SampleFile(this, "vite.config.ts", {
        sourcePath: path.join(__dirname, dir, "vite.config.ts"),
    });
    new SampleFile(this, "index.html", {
        sourcePath: path.join(__dirname, dir, "index.html"),
    });
    new SampleDir(this, "src", {
        sourceDir: path.join(__dirname, dir, "src"),
    });
    new SampleDir(this, "public", {
        sourceDir: path.join(__dirname, dir, "public"),
    });
}
The package directory refers to
blueprints/vite/package. We’ll address each set of files one by one.Our first file is the
vite.config.ts. Go ahead and place this in blueprints/vite/package/vite.config.ts.import dts from "vite-plugin-dts";
import path from "path";
import react from "@vitejs/plugin-react-swc";
import { defineConfig, UserConfig } from "vite";
// open package.json and read dependencies
const packageJson = require("./package.json");
const dependencies = Object.keys(packageJson.dependencies);
export default defineConfig({
plugins: [react(), dts({ insertTypesEntry: true })],
build: {
sourcemap: true,
lib: {
entry: path.resolve(__dirname, "src/index.tsx"),
name: packageJson.name,
fileName: "index",
},
rollupOptions: {
external: dependencies,
watch: {
include: "src/**",
},
output: {
globals: {
react: "React",
"react-dom": "ReactDOM",
},
},
},
},
} satisfies UserConfig);
The important bits here are that we include the
dts plugin to build our type definition files for consumer libraries, point to the entry point of our application in build lib entry, and define the set of libraries we do not want to bundle into our package. This example assumes that all of our dependencies should be excluded from bundling so they are read from package.json and passed to build.rollupOptions.external.The next sample file is an
index.html. This is actually the same as our app file. Copy index.html from the other directory of examples. This is used for testing your library components in isolation rather than as an entry point for a whole application.The
src folder should contain two files: main.tsx and index.tsx.Here’s
blueprints/vite/package/src/main.tsx:import React from "react";
import ReactDOM from "react-dom/client";
import { HelloWorld } from ".";
ReactDOM.createRoot(document.getElementById("root") as HTMLElement).render(
<React.StrictMode>
Use this to run a local development environment of the library for
testing
<HelloWorld />
</React.StrictMode>,
);
Main in this case is used for testing only and isn’t distributed with your library.
The file
blueprints/vite/package/src/index.tsx is the entry point to your library.export const HelloWorld = () => {
return <h1>Hello World</h1>;
};
Here we define the simplest of components.
Finally, the
public folder is for static assets and contains only the vite.svg file like the other blueprint. Copy the public folder from the other blueprint.This was a big step. We have now defined two blueprints we can stamp out in our monorepo and maintain from this one definition of our packages! Let’s run Projen to flesh out our library component with our sample files.
npx pdk
Using our library
Now that we have a library with a humble component. Let’s show ourselves that we can use it by putting it in our App.tsx inside of mywebapp.
Add a deps list to the mywebapp definition in
.projenrc.ts.deps: ["@mymonorepo/mylib@workspace:*"],
Synthesize the update to your project files.
npx pdk
This will update the package.json for the mywebapp project.
Now, place a call to our mylib component,
<HelloWorld />, anywhere in the mywebapp App.tsx.Start up your vite dev server on mywebapp:
npx nx run mywebapp:dev
You should see your
HelloWorld component rendered on the screen. Additionally, you should be able to modify your HelloWorld component inside of mylib and see it update as if it were in the same project as the rest of your application.Now, run the build as well. I’ve included full output below for my build:
% npx nx run mywebapp:build

✔ 1/1 dependent project tasks succeeded [1 read from cache]

Hint: you can run the command with `--verbose` to see the full dependent project outputs

——————————————————————————————————————————————————————————————————————————————

> nx run mywebapp:build [local cache]

👾 build | tsc && vite build
The CJS build of Vite's Node API is deprecated. See https://vitejs.dev/guide/troubleshooting.html#vite-cjs-node-api-deprecated for more details.
vite v5.0.12 building for production...
transforming...
✓ 35 modules transformed.
rendering chunks...
computing gzip size...
dist/index.html 0.46 kB │ gzip: 0.30 kB
dist/assets/react-h3aPdYU7.svg 4.13 kB │ gzip: 2.14 kB
dist/assets/index-4sK4E3Wk.css 1.39 kB │ gzip: 0.72 kB
dist/assets/index-ShZNO4lY.js 143.46 kB │ gzip: 46.14 kB
✓ built in 357ms

——————————————————————————————————————————————————————————————————————————————

> NX Successfully ran target build for project mywebapp and 1 task it depends on (31ms)

Nx read the output from the cache instead of running the command for 2 out of 2 tasks.
With this output, we begin to see how Nx supports our multi-project infrastructure. Nx understands the dependencies of our project by reading the
package.json files. It understands that the mylib project must build before mywebapp. You can also see that it leverages a cache of the build outputs so that the amount of time spent rebuilding unchanged assets is minimized. This will be ever more important as the repository grows.Finally, you can preview the compiled version of the application with the preview task:
npx nx run mywebapp:preview
We now have a multi project build in our repo but no way to deploy it, yet. That’s next.
Deploy with CDK
By now you have probably picked up on the routine. We’re going to add a new package using a Projen construct. This time we have a cdk package generator from the @aws/pdk library with a number of nice features set up for us: automated architecture diagram generation, unit tests, and even threat modeling documentation. Let’s dive right in!
First add the following import to the top of your
.projenrc.ts:import { InfrastructureTsProject } from "@aws/pdk/infrastructure";
Next, add the following before the call to
project.synth().new InfrastructureTsProject({
parent: project,
name: "infrastructure",
defaultReleaseBranch,
packageManager,
sampleCode: true,
// prettier seems to be enabled regardless of setting here
prettierOptions: {
settings: {
tabWidth: 4,
singleQuote: false,
},
},
outdir: "packages/infrastructure",
});
Now run
npx pdk to regenerate your project files.You will find that
packages/infrastructure was created with a fresh cdk project.Our goal at this stage is to deploy
mywebapp to an S3 bucket and set up a CloudFront distribution. This will be minimal because we are just focusing on the build process and code generation process.Some disclaimers and notices before we continue:
- You will have minimal charges to your AWS bill for the actions we will take. Undeploy the stack when finished to minimize charges.
- Learn content security policies and how to use them with CloudFront. We won’t address this here for the sake of focus on build and code generation tools.
- Create a TLS certificate for your domain and set the minimum TLS version to 1.2 or better on the Cloudfront distribution.
Without further ado, let’s open the generated
packages/infrastructure/src/stack/application-stack.ts and replace it with the following content:import { CfnOutput, Stack, StackProps } from "aws-cdk-lib";
import {
CloudFrontWebDistribution,
GeoRestriction,
OriginAccessIdentity,
ViewerProtocolPolicy,
} from "aws-cdk-lib/aws-cloudfront";
import {
BlockPublicAccess,
Bucket,
BucketEncryption,
} from "aws-cdk-lib/aws-s3";
import { BucketDeployment, Source } from "aws-cdk-lib/aws-s3-deployment";
import { Construct } from "constructs";
export class ApplicationStack extends Stack {
constructor(scope: Construct, id: string, props?: StackProps) {
super(scope, id, props);
const websiteBucket = new Bucket(this, "websiteBucket", {
blockPublicAccess: BlockPublicAccess.BLOCK_ALL,
encryption: BucketEncryption.S3_MANAGED,
minimumTLSVersion: 1.2,
enforceSSL: true,
});
const originAccessIdentity = new OriginAccessIdentity(
this,
"OriginAccessIdentity",
);
websiteBucket.grantRead(originAccessIdentity);
const distribution = new CloudFrontWebDistribution(this, "cf", {
originConfigs: [
{
s3OriginSource: {
s3BucketSource: websiteBucket,
originAccessIdentity,
},
behaviors: [{ isDefaultBehavior: true, compress: true }],
},
],
geoRestriction: GeoRestriction.denylist("KP", "RU"),
viewerProtocolPolicy: ViewerProtocolPolicy.REDIRECT_TO_HTTPS,
});
new BucketDeployment(this, "bucketDeployment", {
destinationBucket: websiteBucket,
sources: [Source.asset("../mywebapp/dist")],
distribution,
});
new CfnOutput(this, "websiteUrl", {
exportName: "websiteUrl",
value: `https://${distribution.distributionDomainName}`,
});
}
}
This stack strives to be as minimal as possible for the sake of focus on Projen and pdk.
First we create an S3 bucket. We set some basic security policies here. CDK Nag is enabled on projects generated with InfrastructureTsProject so the basic security controls on the bucket are explicitly enforced.
Next we grant read access to the bucket from CloudFront using an Origin Access Policy. This enables us to block public access on the S3 bucket while granting access to CloudFront to deliver files from it.
A minimal CloudFront distribution will make our webapp available on a cloudfront.net domain. Geo restrictions are added to satisfy CDK Nag constraints but could easily be less or more restrictive based on your preferences.
A bucket deployment copies the contents of our
mywebapp/dist folder to the S3 bucket.Finally, a
CfnOutput provides a websiteUrl output on our stack so that it’s easy to retrieve the domain name of our deployed webapp.Now we are ready to test how cdk synthesizes this stack. You can run
cdk synth via nx with the following command.npx nx run infrastructure:synth
You will find that you get an error if your
packages/mywebapp/dist folder is empty. With the stack trace outputs removed, here is what I see at this step.% npx nx run infrastructure:synth
> nx run infrastructure:synth
👾 synth | cdk synth
Error: Cannot find asset at … packages/mywebapp/dist
…
👾 Task "synth" failed when executing "cdk synth" (cwd: /Users/acowan/projects/writing/2024/02/pdk-for-prototyping/packages/infrastructure)
Warning: run-commands command "pnpm exec projen synth" exited with non-zero status code
———————————————————————————————————————————————
> NX Ran target synth for project infrastructure (5s)
✖ 1/1 failed
✔ 0/1 succeeded [0 read from cache]
The synthesis failed because
packages/mywebapp/dist is missing. This kind of cross package dependency concern is what motivated me to learn Projen and Nx. It is simply something a computer should manage for us and it should only repeat build steps when absolutely necessary. I also shouldn’t have to keep track of whether my build outputs are aligned with my source files. Computers are great at doing things like this. So let’s fix it. Projen has a solution.In this specific case, the only reference between the infrastructure project and mywebapp is the relative path reference in the bucket deployment
Source.asset("../mywebapp/dist"). If it were a reference inside of a package.json file, Nx would have determined there was a build dependency and executed the build for the dependee project first. A package.json dependency here isn’t exactly correct because we don’t want to reference mywebapp code in our CDK application, we just want to deploy its build output. What we want instead is an implicit dependency between the two projects. Here’s how we do that.In
.projenrc.ts, assign the mywebapp package and infrastructure projects to variablesconst webapp = new ViteReactSWCTypescriptAppProject({...});
const infra = new InfrastructureTsProject({...});
Use the project variable to assign an implicit dependency between these projects like this.
project.addImplicitDependency(infra, webapp);
After running
npx pdk to update your project files, you will see that Nx builds mywebapp before building the infrastructure project. This is what a portion of my output looks like:% npx nx run infrastructure:build
✔ 2/2 dependent project tasks succeeded [0 read from cache]
Hint: you can run the command with --verbose to see the full dependent project outputs
———————————————————————————————————————————————
> nx run infrastructure:build
👾 build » post-compile » synth:silent | cdk synth -q
…
We see in this output that Nx built both our library and application before synthesizing the CDK project. This is because Projen added an implicit dependency in the
project.json for the infrastructure project.packages/infrastructure/project.json
{
"name": "infrastructure",
"root": "packages/infrastructure",
…
"implicitDependencies": [
"mywebapp"
],
"//": "~~ Generated by projen. To modify, edit .projenrc.js and run \"npx projen\"."
}
One final tweak we can make to the infrastructure build is that running the deploy target doesn’t call the build target automatically. For the work I typically do, this would be really helpful.
First, I take a look at
tasks.json so that I can see how the deploy build target is constructed now.{
"tasks": {
…
"deploy": {
"name": "deploy",
"description": "Deploys your CDK app to the AWS cloud",
"steps": [
{
"exec": "cdk deploy",
"receiveArgs": true
}
]
},
…
}
Deploy is a single step that calls cdk deploy passing along any additional arguments provided on the command line.
Just as we modified tasks on our earlier work in our webapp project, we must first remove the existing task in
.projenrc.ts and then add it again. Add these lines below the declaration of the infra variable.infra.removeTask("deploy");
infra.addTask("deploy", {
description: "Deploys your CDK app to the AWS cloud",
steps: [
{
spawn: "build",
},
{
exec: "cdk deploy",
receiveArgs: true,
},
],
});
In our new deploy task, we spawn the build task and then run cdk deploy. This connects our entire build process together, leveraging Nx’s build cache and dependency tree.
Additional PDK Features for CDK packages
There are a few more items to point out in the CDK project. The CDK blueprint provided by PDK includes a couple of features that can really help as a project matures. One is automatic diagram generation and the other is threat model generation.
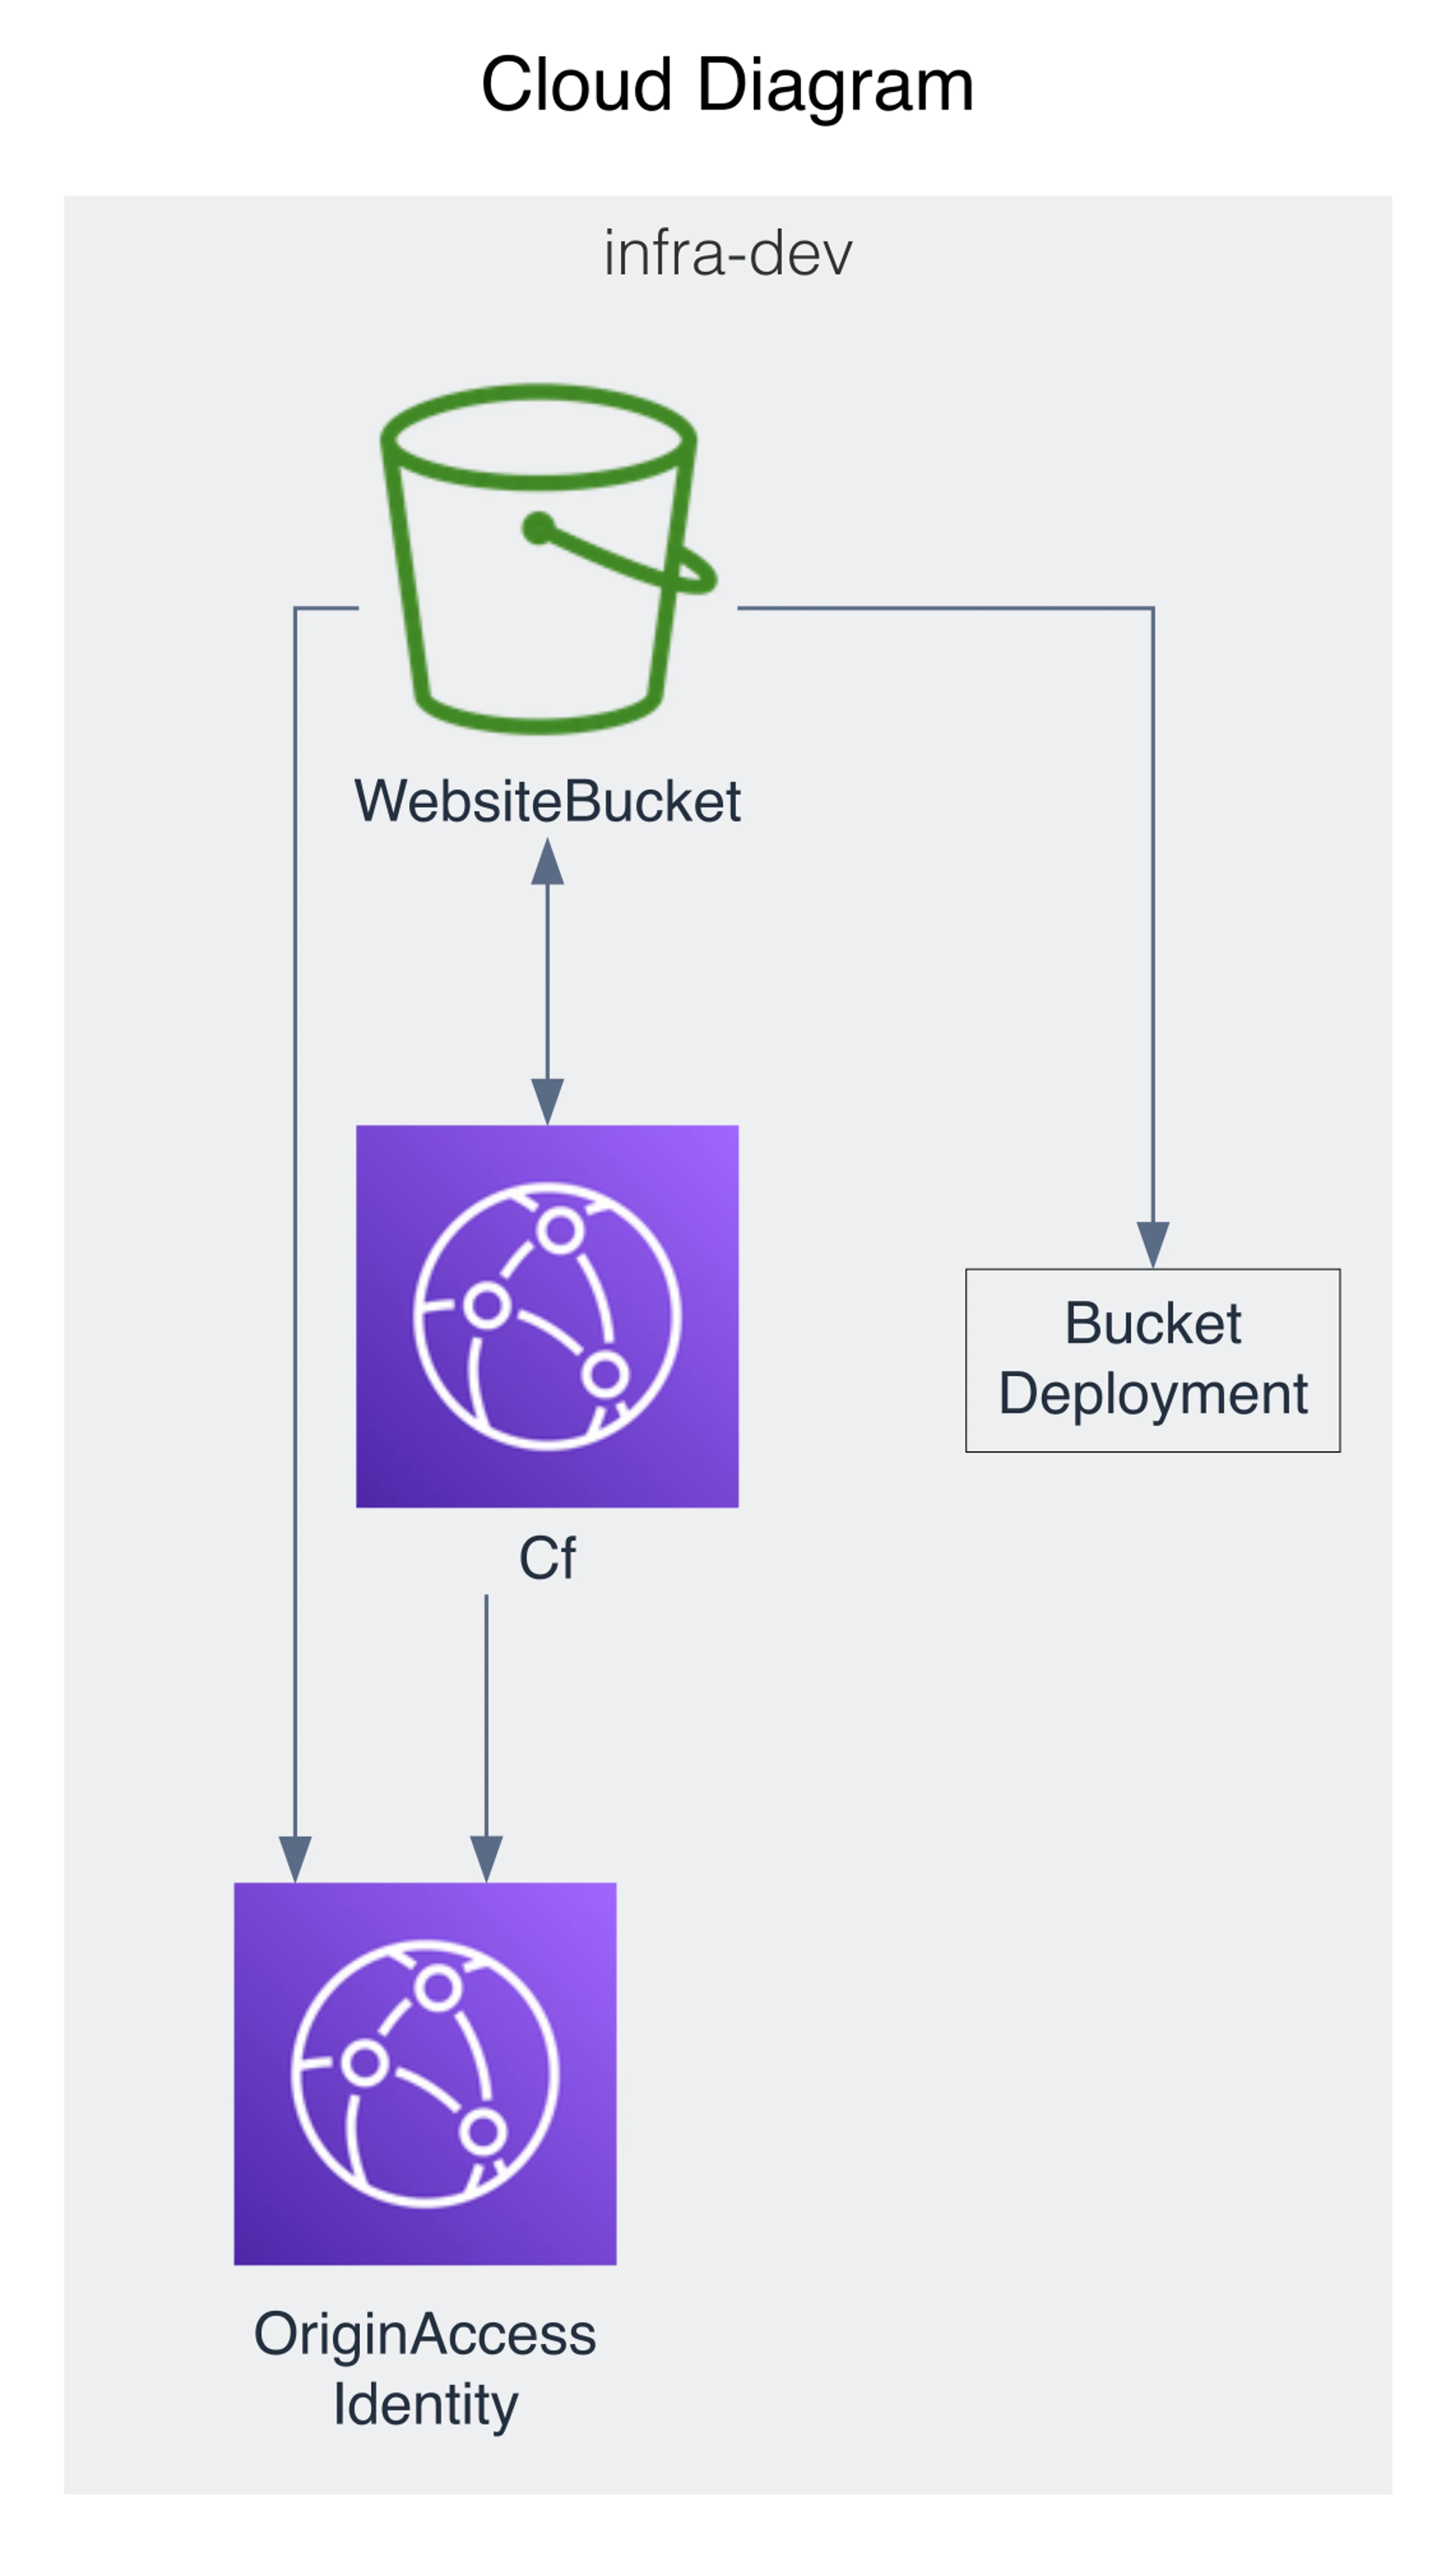
You’ll find these in the
packages/infrastructure/cdk.out/cdkgraph directory.% ls -l packages/infrastructure/cdk.out/cdkgraph/
total 1824
-rw-r--r--@ 1 acowan staff 4803 Feb 18 09:05 diagram.dot
-rw-r--r--@ 1 acowan staff 294347 Feb 18 09:05 diagram.png
-rw-r--r--@ 1 acowan staff 21763 Feb 18 09:05 diagram.svg
-rw-r--r--@ 1 acowan staff 237 Feb 18 09:05 graph-metadata.json
-rw-r--r--@ 1 acowan staff 152851 Feb 18 09:05 graph.json
-rw-r--r--@ 1 acowan staff 408291 Feb 18 09:05 threat-model.tc.json
The diagram for our humble application looks like this. Not bad for a free diagram!
You can learn more about the threat composer plugin in the PDK documentation about Threat Composer and in the Threat Composer github repo https://github.com/awslabs/threat-composer. You can upload the generated
threat-model.tc.json to a webapp at https://awslabs.github.io/threat-composer/ to begin building your security documentation. Threat model documentation can be challenging to write without a tool due to all the cross referencing involved but Threat Composer makes the process less challenging.Reflection
We bootstrapped two different vite blueprints, created a library, a webapp, and then deployed it to the AWS cloud. While this is a simple example, I expect you see how the abstraction provided by Projen can scale quite quickly, reducing the effort required to keep a monorepo and all the tooling used within tidy. Additionally, we customize the build steps such that we can use a single command to deploy a complex project with multiple packages to build before we synthesize our cdk application. Finally, we examined the built in PDK features for automated diagram creation and threat model documentation.
Where can we go from here?
- Create packages in python or java
- Create a jupyter notebook package that leverages your python library packages
- Build docker images that are built before your cdk build runs. This would enable you to use more capabilities of docker than what CDK enables today when you point it to a folder with a Dockerfile..
- Create packages for your CDK constructs to reuse across multiple projects
- Build a regression/integration test that depends on a deployment step
- Add a CI build CDK template to deploy the project
Now go build!
© 2024 - 2026 Archie Cowan